When you enable SSL on a Synology Diskstation, accessing it over the local network will throw up a selection of security warnings on browsers.
There are 3 choices here for the LAN user:
- Ignore the warnings and click through
- Register an Internet FQDN to your local IP
- Create a self-signed SSL and root CA to sign the SSL
Choice 1 is the easiest but it gets annoying after a while. If you are using the NAS locally in your house only and you’re not making it available over the internet, you might as well disable SSL altogether as you won’t be getting much benefit out of it. If you’re the geeky type and want to do things the right way, however, keep reading.
Out of the three choices, choice 2 is the most proper way to do it if, especially if you’re making the NAS available over the internet. You will need a public domain name to so you can create a fully qualified domain name (FQDN) for your Diskstation (something like https://ds.mydomain.com). Next you can generate a valid Certificate Signing Request (CSR) for the FQDN and configure DNS to point back to your local LAN and setup whatever routing is required. This is best if you need to secure a local LAN asset where you do not control all devices accessing the Diskstation.
Choice 3 is in my opinion the best option for those who are only using the NAS locally.
It has two prerequisites:
- Your Diskstation must have a fixed IP address on your LAN.
- You must be able to add or assign certificates to devices you want to approve your SSL.
If you can satisfy those conditions, proceed with the following steps:
In DSM 6.0 -> Control Panel -> Security -> Certificate
Click “Add” to start the process and choose “Create self-signed certificate”
First you create a Certificate Authority (CA) which is the master key that will sign the site usable SSL.

You will need to supply the certificate details. What you fill in is not very important, you can use dummy data if you want.
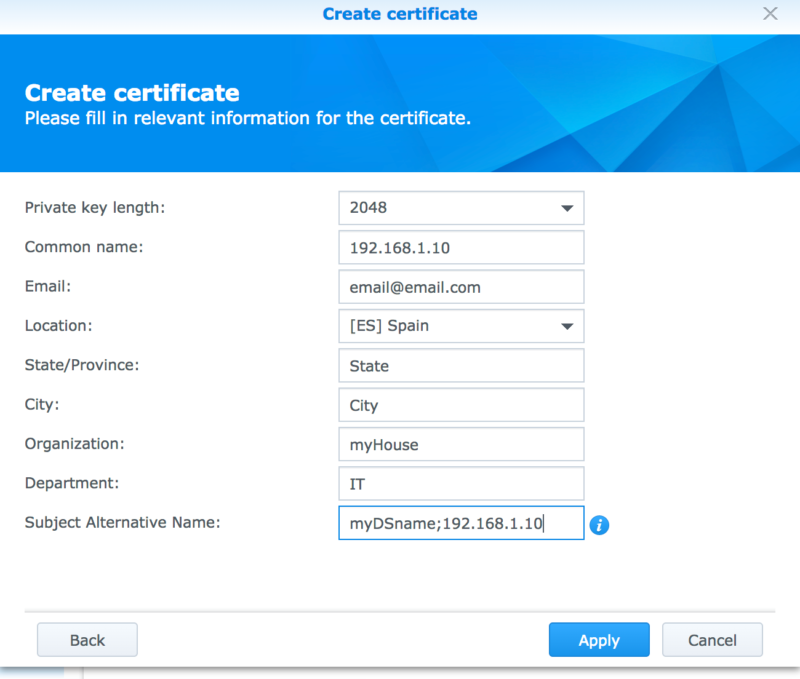
Creating the self-signed certificate from the Synology control panel has a key step that you must complete or the certificate will be invalid. The Subject Alternative Name (SAN) in the second step must contain BOTH the name of the Disktation on your network (“myDSname”) and its local fixed IP (192.168.1.10)
Once your certificate has been generated click “Configure” in DSM to set the new certificate to be the default for the system (The internal web server will restart) so that when you attempt to load the Diskstation site the correct SSL certificate will be presented to your browser.
Now you need to export the newly generated certificates from your Diskstation and import the root CA [and the SSL certificate] into your local machine’s certificate store so that they will be recognised as valid.
Check this page to understand how to install certificates system-wide as well as in specific browsers that handle their own certificates. It also includes details on installing the certificates on your mobile devices (iOS and Android).
Further resources: If you are making the NAS publicly accessibly over the internet, you can follow Mike Tabor’s guide on using Let’s Encrypt SSL certificates as they are completely free and work perfectly.
Related


Is option 3 still possible with DSM 7? If so, can this article be updated?
I would also like to know more as I don’t find the option in DSM 7..
Hi, thanks for sharing. As an SSL noob, I also found a couple of other resources that were super helpful. Since this article has been referenced by a couple of other tutorials on how to create self-signed certs, hopefully readers will see this too.
XCA tool – gui tool to manage & create certificates. Makes creating the certs a matter of mins and way less error prone.
https://www.wildtechgarden.ca/docs/deploy-admin/sysadmin-devops/using-xca-to-create-private-ssl-certificates/
– super easy step by step with XCA
Couple of helpful vids:
https://www.youtube.com/watch?v=1ZJ2DKL_5Cg
https://www.youtube.com/watch?v=FJdxCoC1c4w
After exporting the certificate from Synology, I see files cert.pem and syno-ca-cert.pem, which one should I import to local machine?
Choice 3 mean installing one by one on every devices who want to access synology without not secure warning?
With the recent update to DSM 7, can we still do method 3? I don’t want to expose the nas to internet and want the https://192.168.x.xx:5001 access without Chrome to get me a security warning!
Thanks!
Thanks, it did the job
I put the local hostname of my NAS as the common name, and in the subject alternative name: Its hostname again, its IP on the LAN, the external IP of my modem/router plus its web alias. I just imported the root certificate, after renaming it from .pem to .crt, to the root certificate store (instead of letting Windows choose the intermediate certificate store by default) and it worked at last: I can use HTTPS to my NBAS both from the LAN and from the web (with port forwarding). What a nightmare to configure. But your article helped a lot, thanks.
I am trying to import the certificate into Chrome/Linux. But for all four pems (cert, privkey, syno-ca-cert and syno-ca-privkey) I get error messages, either that the private key is missing, or that the file is corrupt?
Dear Jean,
Thank you for your lovely tutorial.
I have had limited success with my new Christmas present DS1520+ getting the self-signed SSL to be recognised as ‘fully’ secure on Firefox (v84.0) with your method.
I can get a ‘grey’ padlock but not green.
I get a notification “Connection secure”, but “Mozilla does not recognise this certificate issuer. It may have been added from your operating system or by an administrator”.
I hope you don’t mind, but I have similar questions to your other postees
1) A short explanation on the four files produced via the Synology ‘export’ function would be useful as there appear to be two certificates in there. Both of which end up viewable in Firefox, but I’m unclear what each does in terms of which is root CA and which is SSL certificate:
[cert.pem] [privkey.pem] [syno-ca-cert.pem] [syno-ca-privkey.pem]
2) I can get both my Synology NAS access [IP address] and [myCA] certificates into FireFox via Win 7 [Administrator] profile via the MMC system [Trusted Root Certification Authorities] – your link to http://www.bounca.org. But it’s not clear if those same ‘trusts’ work in my routine usage Win 7 profile, even though they are visible.
3) In my working Win 7 profile, as I mentioned in the first point, I’m getting a secure ‘grey’ padlock, and can see two FireFox certificates associated with accessing my NAS.
i) the [IP certificate] tagged [Server Authentication, Client Authentication]
ii) the [myCA] certificate tagged as [Basic Constraints] [Certificate Authority] [Yes]
I feel I have got so near, but yet so far with getting the ‘green’ padlock – so any advice you could kindly offer would be most welcome ?
Kind regards, sedwards
I’m just wondering if this part “Once your certificate has been generated click “Configure” in DSM to set the new certificate to be the default for the system (The internal web server will restart) so that when you attempt to load the Diskstation site the correct SSL certificate will be presented to your browser.” does not interfere with the DDNS certificate for external exposure. If I change this to default, will I still be able to connect through ssl externally?
I used syno-ca-cert.pem under Windows 8.1 and in Firefox and that seemed to work fine. The tip about .local is also useful for Ubuntu. As a workaround, I had already added “myDSname” to my Ubuntu hosts file, but it is a good idea to include the .local alias in the certificate.
Have to use syno-ca-cert.pem and not syno-ca-privkey.pem for it to work.
After that Chrome was able to detect the cert and the warning went away.
Only issue is it wont work for services on the same ip but different port (docker containers).
Nice guide, it’s very close to this one from 2017: https://niallbest.com/secure-your-synology-diskstation-local-ip-via-self-signed-ssl/
I did end up with disabling SSL because my DS is only accessible locally 🙁
Thanks a lot, this is exactly what I was looking for and could not find elsewhere.
Did not manage to import the certificates in Windows 10, though.
When I try to import syno-ca-privkey.pem, it says “The file type is not recognizable. Select another file.”.
Any idea what I am doing wrong ?
Thanks in advance.
just rename it to crt
Good tutorial.
Could use a bit more Synology specific detail regarding the export of Certs and getting them into local machines. The sublink is not specific enough to the Synology case. For example, exporting the self-signed cert creates 4 files:
cert.pem
privkey.pem
syno-ca-cert.pem
syno-ca-privkey.pem
The assumption is that it’s the ‘syno-ca-privkey.pem’ that need to be imported into Mac OSX via Keychain. (which indeed IS the .pem that needs to be imported). The separate link tutorial talks about a ‘root ca’ which will likely confuse people who don’t regularly work with server certs.
Likewise information on “must contain BOTH the name of the Disktation on your network (“myDSname”)” could be clearer. (1) where to find said info & (2) is it case-SenSITive?
Also “myDSname” should also include “;myDSname.local” for working on Mac OSX, otherwise with just “myDSname” it will give CERT error regarding invalid name.
Thanks for take the time to write this tutorial up. Overall it did help. (The “.local” requirement for Mac threw me for a loop a couple of times. I ended up using ‘myDSname;192.168.x.y;myDSname.local’ to get it working on my Mac network.