Jean Galea

Health, Wealth, Relationships, Wisdom

  • Start Here
  • Guides
    • Beginner?s Guide to Investing
    • Cryptocurrencies
    • Stocks
    • P2P Lending
    • Real Estate
    • Forex
    • CFD Trading
    • Start and Monetize a Blog
  • My Story
  • Blog
    • Cryptoassets
    • P2P Lending
    • Real estate
  • Consultancy
    • Consult with Jean
    • Consult a Lawyer on Taxation and Corporate Setups
  • Podcast
  • Search

Retro Gaming on the NES – Exploring the Classics That Started It All

Published: June 24, 2025Leave a Comment

nes

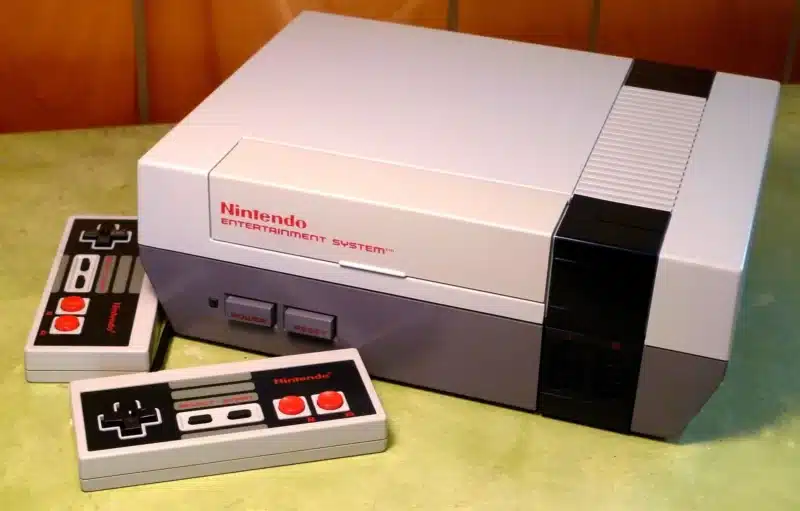
The Nintendo Entertainment System (NES) is where retro gaming truly begins for most people. It’s a system packed with iconic titles, foundational gameplay mechanics, and legendary characters that continue to influence gaming to this day.

Even if you didn’t grow up with it, the NES offers a library that’s still incredibly fun — and often surprisingly challenging. In this article, I’ll walk you through a short history of the NES, the best ways to emulate it, and some standout games to try, especially if you’re into co-op or playing with your kids.

A Short History of the NES

The NES was released in Japan as the Famicom in 1983, then in North America in 1985 as the Nintendo Entertainment System. It essentially saved the video game industry after the crash of 1983 and laid the groundwork for Nintendo’s future dominance.

  • Mario, Zelda, Mega Man, Metroid all got their start here
  • Introduced 2D platformers as a standard
  • Popularized the D-pad and controller layout
  • Made home gaming a shared family activity

Why It’s Still Worth Playing

The NES has aged better than you might think. Especially if you appreciate straightforward game design. Here’s why I keep going back to it:

  • Quick to pick up — minimal menus, fast sessions
  • Perfect for kids — especially turn-based or puzzle games
  • A ton of great co-op and 2-player games
  • Huge nostalgia value, even if you didn’t own one

Emulating NES Games

There are many ways to emulate NES games today. I’ve tested a number of them on handhelds, laptops, and TV setups.

Best Emulators

  • Mesen – Best accuracy, great filters, rewind, save states
  • Nestopia – Solid performance, low resource use
  • FCEUX – Good for debugging or advanced features
  • RetroArch (Mesen core) – Great for handhelds or consolidated libraries

Recommended Hardware

  • Handhelds: Retroid Pocket, Miyoo Mini, Anbernic
  • Desktop: Raspberry Pi, EmuDeck
  • Overkill but great: Steam Deck with RetroArch

Tips

  • Use save states and rewind features
  • Enable turbo A/B on handhelds for button mashers
  • Use CRT or pixel-perfect filters depending on taste

My Favorite NES Games

Game Type Why It’s Great
Chip ‘n Dale: Rescue Rangers Simultaneous co-op Fun platforming, easy for kids, charming visuals
Contra Simultaneous co-op Fast-paced action, perfect for kids with a second player
Bubble Bobble Simultaneous co-op Colorful puzzle platformer, great for all ages
DuckTales Single-player Excellent level design and soundtrack
Super Mario Bros. 3 Turn-based multiplayer One of the best platformers ever made
Dr. Mario Competitive 2-player Classic puzzle gameplay, ideal for quick sessions
River City Ransom Simultaneous co-op Beat-’em-up with RPG elements and humor

Where to Get Games

You’ll need NES ROMs, which are widely available online — look for clean No-Intro sets. These are exact digital dumps of the original cartridges.

If you prefer a legal alternative, Nintendo Switch Online offers a curated NES library, though it’s tied to an active subscription and online access.

Final Thoughts

The NES still holds up — not just as a piece of gaming history — but as a genuinely fun platform to explore. Its simplicity makes it one of the best entry points into retro gaming, and emulation makes it incredibly accessible today.

Whether you’re introducing a child to Mario for the first time, or revisiting your favorite childhood titles, the NES has more than earned its place in the retro spotlight.


Filed under: Tech

Retro Gaming on the Game Boy – Reliving the Legendary Handheld through Emulation

Published: June 10, 2025Leave a Comment

gameboy emulation
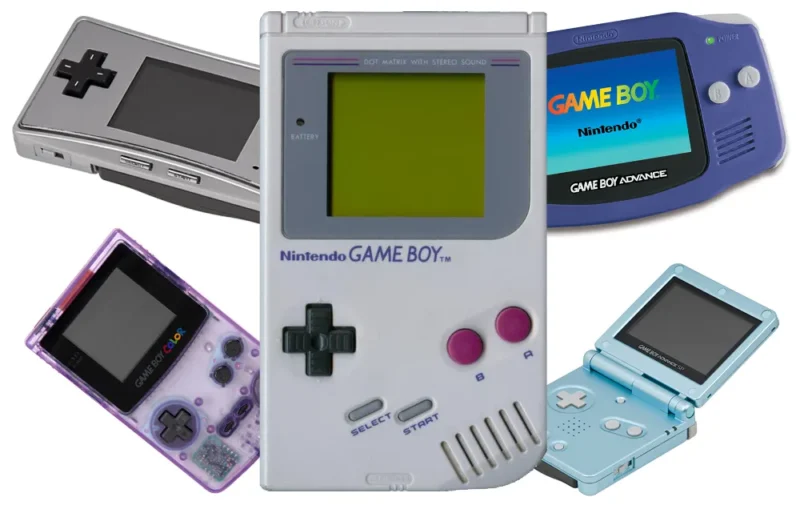
When Nintendo released the Game Boy in 1989, it didn’t just launch a product—it launched a cultural phenomenon. The Game Boy line would go on to sell over 200 million units worldwide and establish handheld gaming as a core part of the industry.

This article explores each version of the Game Boy, highlights the top 10 essential games, and provides guidance on which systems are best for retro gaming today.


🎮 Game Boy (1989)

The Original “Fat” Game Boy was Nintendo’s first foray into portable gaming. With its green-tinted monochrome display, D-pad, and two-button controls, it looked simple but proved revolutionary.

  • Monochrome screen with greenish tint
  • 10-30 hours on 4 AA batteries
  • Instant classic design and portability

Retro Gaming Note: Great for nostalgic charm, but limited by its screen and sound capabilities. Most people emulate GB games via GBC or GBA emulation today.

🎮 Game Boy Pocket (1996)

A sleeker, smaller version with a better screen and improved portability.

  • Compact and lightweight
  • Improved screen with no green tint
  • Required 2 AAA batteries

Retro Gaming Note: Same game compatibility as original Game Boy. A good physical choice for collectors, but not essential for emulation.

🎮 Game Boy Light (1998, Japan Only)

Similar to the Pocket but featured an electroluminescent backlit screen.

  • Backlit monochrome screen
  • Extremely rare and collectible

Retro Gaming Note: Rare and expensive. Not essential unless you’re a hardware purist.

🎮 Game Boy Color (1998)

Brought full color to the Game Boy line and introduced new cartridge formats.

  • Full-color screen
  • 8-bit processor with improved speed
  • Slim, rounded design

Retro Gaming Note: Essential for playing color-enhanced versions of classics. Best way to enjoy both original Game Boy and GBC-exclusive titles.

🎮 Game Boy Advance (2001)

A 32-bit system with shoulder buttons and wide game compatibility.

  • 32-bit CPU
  • Shoulder buttons (L and R)
  • Backward compatibility with all previous Game Boy games

Retro Gaming Note: The most versatile platform. Can run nearly the entire Game Boy library (GB, GBC, GBA) with better controls and performance.

🎮 Game Boy Advance SP (2003)

Refined version of the GBA with backlight and rechargeable battery.

  • Rechargeable battery
  • Folding design to protect screen
  • Bright screen ideal for all lighting conditions

Retro Gaming Note: Widely considered the best physical Game Boy hardware for retro gaming. The backlit AGS-101 model is especially beloved.

🎮 Game Boy Micro (2005)

Ultra-compact GBA variant with a sharp screen but no backward compatibility.

  • Tiny size, highly portable
  • Bright, crisp screen
  • GBA game compatibility only

Retro Gaming Note: Only good for GBA titles. Best suited for collectors or ultra-portable fans.


🕹️ Recommended Game Boy Platform(s) for Retro Gaming

✅ Best All-in-One System: Game Boy Advance (or SP)

  • Plays the widest range of games (GB, GBC, and GBA)
  • Best value for space and compatibility

Retroarch & OpenEmu Tip: If you’re emulating, you only need to install a Game Boy Advance core (like mGBA in RetroArch or OpenEmu). Once installed, you can load ROMs from Game Boy, Game Boy Color, and Game Boy Advance into a single GBA folder, and they will all work. The GBA emulator handles backward compatibility just like the original hardware.

✅ For Game Selection + Visuals: Game Boy Color + Game Boy Advance

  • Some Game Boy Color games, such as Shantae or Metal Gear: Ghost Babel, pushed the hardware to its visual limits with vibrant palettes and fluid animations.
  • Modern emulators like mGBA emulate GBC functionality fully, even when run through a GBA core.
  • Game Boy Advance titles offer the most advanced 2D visuals and audio in the Game Boy family. Games like Wario Land 4 and Metroid Fusion showcase the system’s graphical capabilities and sound design.

❗ Skip If You’re Emulating:

  • Game Boy Pocket and Game Boy Light (offer no additional compatibility or performance)
  • Game Boy Micro (GBA-only)

🔧 Best Handheld Devices for Game Boy Emulation

When selecting a handheld device for emulating Game Boy titles, screen size and aspect ratio are crucial for an authentic experience. The original Game Boy and Game Boy Color featured a 10:9 aspect ratio, while the Game Boy Advance utilized a 3:2 aspect ratio. Here are some top recommendations:

⭐ Miyoo Mini+

  • Screen: 2.8-inch IPS display with a 4:3 aspect ratio.
  • Pros: Highly portable, excellent for Game Boy and Game Boy Color games.
  • Cons: Smaller screen may not appeal to all users.
  • Emulation: Runs GB, GBC, and GBA games smoothly using Onion OS.

⭐ Anbernic RG35XXSP

  • Screen: 3.5-inch IPS display with a 4:3 aspect ratio.
  • Pros: Clamshell design reminiscent of the GBA SP, comfortable for extended play.
  • Cons: Lacks analog sticks, which may limit compatibility with some games.
  • Emulation: Handles GB, GBC, and GBA titles effectively.

⭐ Analogue Pocket

  • Screen: 3.5-inch LTPS LCD with a 1600×1440 resolution, matching the 10:9 aspect ratio of the original Game Boy.
  • Pros: FPGA hardware offers near-perfect emulation, supports original cartridges.
  • Cons: Higher price point, limited availability.
  • Emulation: Exceptional accuracy for GB, GBC, and GBA games.

⭐ AYANEO Pocket Micro

  • Screen: 3.5-inch display with a 4:3 aspect ratio.
  • Pros: Premium build quality, powerful hardware capable of emulating up to GameCube titles.
  • Cons: Higher cost, may be overkill for solely Game Boy emulation.
  • Emulation: Excellent performance for GB, GBC, and GBA games.

⭐ Retroid Pocket 5

  • Screen: 5.5-inch OLED display with a 16:9 aspect ratio.
  • Pros: Powerful hardware, versatile for various emulation needs.
  • Cons: Widescreen aspect ratio may not perfectly match original Game Boy games.
  • Emulation: Capable of running GB, GBC, and GBA games with ease.

⭐ FPGBC (FunnyPlaying Game Boy Color FPGA)

  • Screen: 2.6-inch IPS display, closely matching the original Game Boy Color.
  • Pros: FPGA-based hardware offers authentic Game Boy Color experience; supports original cartridges; excellent build quality.
  • Cons: Assembly required; limited to GB and GBC games.
  • Emulation: Not applicable; runs games natively without emulation.

⭐ Powkiddy RGB30

  • Screen: 4-inch 720×720 IPS display with a 1:1 aspect ratio.
  • Pros: Square screen ideal for GB and GBC games; affordable price point; good battery life.
  • Cons: Build quality may feel less premium; performance may vary with more demanding systems.
  • Emulation: Excellent for GB, GBC, and GBA games; supports various retro systems.

⭐ TrimUI Smart Pro

  • Screen: 5-inch 720p display with a 16:9 aspect ratio.
  • Pros: Affordable; large screen; decent performance for retro games.
  • Cons: Widescreen aspect ratio may not be ideal for GB/GBC games; controls may feel less responsive.
  • Emulation: Suitable for GB, GBC, and GBA games; performance may vary with more demanding systems.

When choosing a device, consider the screen’s aspect ratio and size to ensure the best possible experience for Game Boy emulation. Devices like the Analogue Pocket and Anbernic RG35XXSP offer screens that closely match the original Game Boy’s display, providing a more authentic feel. For those seeking portability, the Miyoo Mini+ is an excellent choice, while the AYANEO Pocket Micro and Retroid Pocket 5 cater to users desiring broader emulation capabilities.


👁️ Top 10 Game Boy Games (Spanning All Generations)

These 10 titles represent the Game Boy platform’s legacy, influence, and diversity across its many forms — without relying on Pokémon entries:

  1. Tetris (GB) – The killer app that sold millions of Game Boys
  2. The Legend of Zelda: Link’s Awakening (GB/GBC) – A full Zelda adventure in your pocket
  3. Metroid II: Return of Samus (GB) – Essential for Metroid lore, and later remade as Samus Returns
  4. Super Mario Land 2: 6 Golden Coins (GB) – Introduced Wario and massive improvement over the first game
  5. Wario Land 4 (GBA) – One of the most polished platformers on the GBA
  6. Advance Wars (GBA) – Addictive tactical gameplay with incredible replayability
  7. Castlevania: Aria of Sorrow (GBA) – Metroidvania perfection on handheld
  8. Fire Emblem (GBA) – First English release of the legendary series
  9. Shantae (GBC) – One of the most visually impressive and technically ambitious GBC games
  10. Metal Gear: Ghost Babel (GBC) – A brilliant stealth-action experience uniquely crafted for handhelds

In every iteration, the Game Boy combined intelligent design, great games, and legendary portability. Whether it was the green screen of the original or the sleek form of the Micro, Nintendo’s handheld legacy began with a simple idea: great games, anywhere.

Filed under: Tech

Retro Gaming Handheld Consoles – Great for Kids and Adults Alike

Published: December 10, 2024Leave a Comment

retro gaming

Video games were present in every stage of my childhood and teenage years, and I continue to play games regularly to this day. I consider gaming to have been an immensely formative experience for me, as well as an essential outlet for stress and a trigger for my imagination.

When I had kids, I was determined to prevent them from drifting into the world of shallow games on iPads and phones, which I mostly consider to be utter garbage. Instead, I wanted them to experience the every early games as I had done. When they’re older, they can decide for themselves which games they want to play, but for now I wanted an offline, one or two player simple experience in their gaming sessions, and retro games fit the bill perfectly.

In an age dominated by powerful gaming PCs, cutting-edge consoles, and visually stunning open-world games, it’s easy to overlook the simple magic of retro handheld consoles. These pocket-sized devices are not just nostalgia machines for those of us who grew up in the 80s and 90s, but they also offer an engaging and accessible experience for kids today. Whether you’re a parent wanting to introduce your child to the classics or an adult craving a trip down memory lane, retro gaming handheld consoles provide hours of entertainment for everyone.

A Bridge Between Generations

Original retro gaming handhelds like the Game Boy or the Sega Game Gear have always been sought-after as collectors’ items, however there has been a huge advancement in the availability, affordability and variety of retro game emulator handhelds. They are simple to pick up and play and typically can store thousands of games on them. There’s no complicated online account setup, no over-complicated tutorials—just pick up and play. For adults, it’s a reminder of simpler times, when gaming was about beating high scores and discovering secrets level by level. For kids, it’s a chance to learn the roots of the games they love today and build a shared bond with their parents.

Simplicity is the Key

One of the greatest appeals of retro handheld gaming is the simplicity of gameplay. Classic titles like “Tetris,” “Super Mario Land,” or “Sonic the Hedgehog” are easy to understand but difficult to master. This kind of simplicity is wonderful for kids, who can start playing instantly without needing to navigate complex systems. At the same time, it can provide adults with a sense of achievement after completing levels that are challenging in their own unique way.

Nostalgia and New Memories

For adults, picking up a retro handheld console isn’t just about playing a game—it’s about nostalgia. The pixel art graphics, the iconic chiptune music, and even the slightly washed-out screens take many back to their childhoods. Introducing these elements to a new generation not only brings a sense of shared history but also adds a touch of novelty that today’s polished, photorealistic games can’t quite capture. There’s something uniquely satisfying about sitting down with your child and saying, “This is the kind of game I played when I was your age.” It allows parents and children to connect over shared experiences—one past, one present, but both enjoying the moment.

Ideal for Travel

Retro handheld emulator consoles are also ideal for travel. Compact and lightweight, they’re perfect companions for road trips, long flights, or even waiting in line. Modern iterations of retro handhelds now come with hundreds of preloaded games, eliminating the need for multiple cartridges. The battery life of these devices is also designed to last for hours, making them perfect for keeping kids occupied on a long journey or giving adults a distraction during their commute.

A Wide Range of Options

The resurgence of retro gaming has resulted in many modern handhelds hitting the market, such as the Anbernic RG series, Retroid Pocket, and even Nintendo’s classic Game & Watch re-release. These devices blend nostalgia with modern tech, offering retro games with quality hardware that boasts bright screens and comfortable controls. Most even offer save states, so you don’t have to start over every time—a luxury the original consoles never had!

Affordable and Accessible

Compared to modern consoles that can be costly and require pricey games, retro handhelds are often much more affordable. Whether you’re buying an authentic refurbished console or a newly built retro-style device, these handhelds are relatively inexpensive, making them accessible to both kids who may be prone to dropping their devices and adults who don’t want to break the bank.

My Favorite Devices

There are several retro handheld consoles that stand out to me personally, each with its own unique features that make it a joy to use:

Trimui Smart: This small but powerful device is incredibly pocketable, making it perfect for taking anywhere. Despite its compact size, the Trimui Smart offers a surprising number of classic games, and its intuitive interface makes it easy for both adults and kids to pick up and play. Its simplicity and portability are its greatest strengths, offering hours of fun without any hassle. It’s great for gifting to kids or adults.

Anbernic RG40XXH: The Anbernic RG40XXH is another favorite. Known for its excellent build quality, bright screen, and ergonomic design, it feels great in the hands, even during extended play sessions. The RG40XXH also comes with a broad library of preloaded games, making it a fantastic choice for those looking to dive right into their favorite retro titles. Its powerful hardware ensures smooth emulation for a wide range of classic games.

Powkiddy RGB30: The Powkiddy RGB30 stands out due to its vibrant screen and user-friendly controls. It’s a bit larger compared to some other handhelds, but that makes it perfect for enjoying the colorful pixel art of classic games. The RGB30 is also highly versatile, supporting a variety of retro systems, which makes it an ideal choice for both newcomers and seasoned retro gamers alike. It strikes a great balance between performance and affordability.

Miyoo Mini Plus: The Miyoo Mini Plus is a charming device that brings together a cute, compact design with impressive gaming capabilities. Its small form factor makes it easy for kids to handle, while adults will appreciate its nostalgic feel. The Miyoo Mini Plus also features save states and customizable settings, making it one of the more user-friendly options on the market. Despite its small size, it packs a punch in terms of gameplay and offers a wonderful retro experience for all ages.

Anbernic RG353PS: This is perfect for gifting to kids or friends who would appreciate reliving their childhood. Combined with ArkOS you can really make it simple for these two profiles of users to get started with playing right away without any hang ups. Follow the guide here to set things up.

Operating Systems for Retro Handhelds

The experience of using retro handheld consoles can be further enhanced by choosing the right operating system. Many of these devices support custom firmware that offers improved features, better emulation, and more user-friendly interfaces.

ArkOS: ArkOS is a popular custom firmware used for many retro handheld devices. It is known for its stability and wide range of supported systems, providing a polished experience for those who want to get the most out of their device. ArkOS is particularly favored for devices like the Anbernic RG series, where it brings a host of features including better game organization, save states, and performance enhancements.

MiniUI (for Trimui Smart): The Trimui Smart really shines when paired with MiniUI. This lightweight operating system is designed to keep things simple, sticking with the core idea of pick-up-and-play. MiniUI is easy to navigate, offers a clean interface, and optimizes the performance of the Trimui Smart. It keeps everything streamlined, allowing users to focus on enjoying their favorite classic games without any unnecessary extras.

Batocera: Batocera is another well-known operating system for retro gaming. It is designed to run on a variety of devices, including the Anbernic RG series and other handhelds. Batocera offers a polished user experience with an intuitive interface, a wide range of emulator support, and excellent customization options. It is especially popular for its ease of setup and consistent performance.

ROCKNIX (formerly JELOS): ROCKNIX is an open-source operating system that is optimized for retro gaming handhelds. It’s lightweight, highly responsive, and works well with many devices like the Anbernic RG series. ROCKNIX provides a simplified experience, focusing solely on gaming performance and efficient emulation, which makes it a favorite for those who want a straightforward gaming experience without any unnecessary frills.

Onion OS (for Miyoo Mini Plus): The Miyoo Mini Plus works best with Onion OS, a custom firmware that significantly enhances the user experience. Onion OS provides improved game organization, quick save states, and more efficient battery usage. It’s tailored specifically for the Miyoo Mini line, making it easy to navigate and adding features that make the gameplay smoother and more enjoyable.

Crossmix OS (for Trimui Smart Pro)

These custom operating systems provide not only a functional upgrade but also make the experience of gaming on these handhelds much more enjoyable. They bring additional features like improved emulation support, better battery management, and an overall smoother experience compared to stock firmware.

Remember that you will need BIOS (or here) and ROM (or here) – preferably in the no-intro format to facilitate things like artwork scraping. Here’s a nice curated ROM set for various systems.

When choosing between NTSC (World/USA/Japan) and PAL (Europe) versions of NES games, it’s important to understand that NTSC versions generally provide a smoother and faster experience. NTSC games run at 60Hz, meaning they refresh the screen 60 times per second, resulting in more fluid animations and responsive gameplay. On the other hand, PAL games run at 50Hz, leading to a noticeable slowdown in movement, animations, and even sound—often running at 83% of the speed of NTSC versions. This slower pace affects the overall feel, especially in fast-paced platformers like Super Mario Bros., making NTSC versions preferable for those seeking the original design intent.

These differences are still relevant when using handheld emulators and modern software like OpenEmu or popular handheld devices like Anbernic or Retroid Pocket consoles. Emulators accurately replicate the original hardware, including regional refresh rates, so PAL ROMs will play with slower gameplay and pitch differences just like they did on European systems. If you want the most fluid and authentic gameplay experience, it’s generally recommended to choose the NTSC version, while the PAL version can still be valuable for those nostalgic for the original European experience.

For PlayStation 2, use PCSX2 emulator. For arcade games go here.

Retro Gaming Media

I love the graphics used in retro games, and I’ve been decorating my office with NES game covers. I’ve found some fantastic sites for NES box art, game screenshots and videos:

  • Emumovies
  • Sprites and Screenshots
  • Vimm’s
  • Screenscraper (open a free account)

Game Manuals

Although most games are self-explanatory, it was nice for me to go through the game manuals and discover the answer to perplexities of my childhood when I never had any manuals for the games I played. You can find manuals for NES here.

Conclusion

Retro gaming handheld consoles bring generations together, offer simple yet engaging experiences, and are affordable entertainment solutions that fit in your pocket. They can be a great way to introduce kids to gaming without the complexities of modern titles, while adults can revisit their favorite classics, creating new memories with their children. Whether you’re playing “Donkey Kong,” “Zelda,” or “Pac-Man,” retro handheld consoles prove that great gameplay never gets old.

With my 6 and 4-year-old kids we spend many happy hours playing and challenging each other, while of course implementing some limits on the total time they can spend playing every week. I think this is a nice way to start introducing the concept of balance in life. I don’t agree with banning things outright. I started gaming at an early age and turned out fine, so I’m speaking from experience here. The biggest danger I see in modern gaming is the wild levels of stimulation that most modern games provide. Retro games from the 80s and early 90s are pretty simple, and even as an adult, I can enjoy a 15-minute gaming session before I sleep without feeling that urge to play one more time or one new game. I can’t say the same about taking my phone to bed as I can easily doomscroll for two hours, or watch one YouTube video after another till the early hours, completely destroying the next day’s productivity.

Filed under: Tech

Backing Up Your Data with Synology

Published: May 23, 2023Leave a Comment

Losing data is one of my biggest fears, so I try to make sure this never happens by using sensible backup solutions for all my data.

One of the most important components of my backup strategy is the Synology Diskstation. In this post, I’ll talk about some options and my suggested setup.

The assumption here is that you have a home or office in which all important files are stored in a Synology Diskstation, probably using Shared Folders.

Apart from those files, I have several Mac laptops and an iMac which are being backed up to the NAS (in a separate folder) using Time Machine. I don’t typically keep any important files on my devices to avoid cluttering the hard drives and also to help me keep organized and keep all the data in one place (the NAS).

Navigating the various data management tools provided by Synology DiskStation can feel like a daunting task. Each tool has its unique strengths, purposes, and configuration options. Let’s break down four key solutions offered by Synology: Cloud Station, Cloud Sync, USB Copy, and Hyper Backup.

Cloud Station

Synology’s Cloud Station is an impressive tool designed to synchronize files across multiple devices, including PCs, mobile devices, and other Synology NAS units. This tool offers real-time data synchronization, making it an excellent choice for teams working collaboratively on shared files. If you value real-time sync and having the same files accessible across all your devices, Cloud Station is the way to go.

Cloud Sync

While Cloud Station shines in device synchronization, Cloud Sync is your go-to tool for cloud storage integration. Cloud Sync allows you to link your DiskStation with a wide variety of cloud services like Google Drive, Dropbox, and OneDrive. By doing this, it simplifies the process of managing and backing up files stored on different cloud platforms, all from your DiskStation. If you’re heavily invested in cloud storage, Cloud Sync will undoubtedly be a valuable asset.

USB Copy

USB Copy is an invaluable tool for automating data transfer between your DiskStation and USB devices. If you frequently use USB storage devices and want a simple, automated way to back up these devices or import data from them to your DiskStation, USB Copy is an excellent option. It’s simple, intuitive, and incredibly convenient for quick data transfer tasks.

Hyper Backup

Finally, we have Hyper Backup, which is, in essence, a comprehensive backup solution. It excels in creating multi-version backups not only locally but also to various destinations, including other Synology NAS units, public clouds, and even servers via protocols like rsync/SMB/AFP. If comprehensive, versioned backup is your primary concern, Hyper Backup should be at the top of your list.

Your choice depends largely on your needs. Do you want real-time synchronization across all your devices? Go for Cloud Station. Do you want to manage and backup files across different cloud platforms? Cloud Sync is your best bet. Do you often use USB devices for data transfer? Look no further than USB Copy. And if comprehensive, versioned backup is what you’re after, Hyper Backup is your solution.

Let’s move on to how I use the Synology Diskstation for my own backups.

Local Backups

A handy feature that the DiskStation has is a USB port on the front. I use this for local backups once a month. I have the NAS set up to automatically copy its files onto a particular external drive as soon as I connect it. I then connect it myself at the end of every month and verify that the backup was done correctly. It’s a manual step but it’s a fairly easy one and it gives me a good local backup for my most important files.

For local backups, you can use either USB Copy on Hyper Backup. The latter has the advantage of providing more efficient backup options, versioning and encryption. USB Copy allows you to set a schedule and choose between incremental backups, mirroring and multi-versioned backups. The latter can take up a large amount of space as it creates a dated folder with all the data every time a backup is run, so I don’t suggest it.

I use the USB Copy system, and use Hyper Backup for offsite backups, as detailed later in this article.

Think of USB Copy as a smart interface between your DiskStation and any USB device. It’s an ingenious tool that enables automatic data transfer between your NAS and USB drives, serving as an easy-to-use solution for both backing up your USB drives and importing data to your DiskStation.

Setting up the USB Copy feature on your Synology DiskStation is a walk in the park. The first step is to locate and install the USB Copy application from the Synology Package Center. Once installed, the application intuitively guides you to create customized copying rules for each of your USB devices.

For instance, you can set your DiskStation to automatically transfer photos from your USB device to a specified folder within your DiskStation. Inversely, you can set your DiskStation to backup certain folders to your USB device as soon as it’s connected. The sheer simplicity of the process is commendable and the time-saving element is appreciable.

Cloud Backups

You can use a cloud storage solution like Google Drive or Amazon’s various cloud storage options to take backups of your NAS automatically, and you can even encrypt them before uploading them, of course using a running schedule for completely hands-off.

To set up cloud backups you need to use the CloudStation app on the Synology DiskStation.

Unfortunately, Cloud Sync does not have integration with pCloud (one of my favorite cloud storage providers). However, they do have easy integrations with OneDrive, Dropbox, Amazon S3 and other popular big providers.

Off-Site Backups Using Hyper Backup Vault

Hyper Backup takes data stored on the NAS and backs it up to external media or cloud destinations. It can be configured to store multiple versions of files so you can go back in time and “roll back” to a prior version if it was included in the backup job. This is similar to Apple’s Time Machine backup system.

I’ve been using Hyper Backup for quite a while now and have multiple jobs running on my personal NAS. You can have multiple jobs that backup different files to several locations., so it’s extremely flexible. For example, you can set it to do a full backup to a USB hard drive at night, while another job backups up only a selected number of work files offsite to Amazon S3. The data is encrypted before it gets sent to the cloud provider for added security, so you don’t even need to rely on the cloud provider for encryption or security.

Filed under: Tech

My Hardware Setup

Last updated: March 03, 2023Leave a Comment

With the new M2 processors introduced by Apple and their amazing performance, I’ve decided to switch around my hardware setup to be best suited to my lifestyle. Here’s what I have selected after doing my research.

Macbook Pro 16″ M2

This will be my main machine and will be used at home and at my coworking space/gym. I will also take it with me on longer term travel or trips where I know I will have the time to put in serious work.

The newest MacBook Pro 16″ M2 is a true powerhouse of a laptop that is sure to impress even the most demanding of users. With its powerful M2 chip, this laptop is capable of handling even the most complex tasks with ease. Whether you’re a professional video editor, a graphic designer, or just someone who needs a reliable laptop for everyday use, the MacBook Pro 16″ M2 is sure to exceed your expectations.

One of the standout features of this laptop is its stunning Retina display, which offers incredibly sharp and vibrant visuals. Whether you’re streaming your favorite movies or working on a design project, you can rest assured that everything will look absolutely stunning on this display. The keyboard is also a joy to type on, with its responsive keys and comfortable layout making typing for extended periods a breeze. And with up to 10 hours of battery life, you can work all day without having to worry about running out of juice.

Overall, the MacBook Pro 16″ M2 is an exceptional laptop that is sure to impress even the most discerning of users. With its powerful performance, stunning display, and comfortable keyboard, it’s the perfect choice for anyone who demands the very best from their technology. So if you’re in the market for a new laptop and want the best of the best, the MacBook Pro 16″ M2 is definitely worth considering.

Apple Studio Display

This will be my fixed display in my home office. It’s a great display that is a joy to work on. The Macbook Pro will be connected to it at home.

The main alternatives to the Studio Display are the LG 27MD5KL-B and the Dell UltraSharp U2720Q. The 32 inch version of the Dell is also a good option.

Note about 32 inch 4k displays: Some people may complain about font sizes on a 32-inch 4K display versus Apple’s 32-inch 5K display because of the difference in pixel density. The 5K display has a resolution of 5120 x 2880 pixels, which is higher than the 4K display’s resolution of 3840 x 2160 pixels. This means that the pixel density of the 5K display is higher, resulting in crisper and more detailed images, including text.

iPad Pro 12.9″

This will be my out-and-about machine, and will also be used for some reading and drawing activities. I’ll use it while traveling, going to cafes, and on other occasions where I might or might not have the opportunity to work. In such cases, if I get the chance to work I will typically be writing or drawing, two tasks that the iPad excels with when paired with the Magic Keyboard and Apple Pencil respectively.

Macbook Pro Stand

I will be using either the Satechi stand for holding the Macbook in closed mode (Twelve South Bookarc is a good alternative), or the Twelve South Curve.

Accessories

The Anker powerbank is great if you anticipate working for longer periods in places without a power connection, for example on some airlines, at airports, cafes, libraries etc. Having a powerbank can be great if you work in very popular places. If said places have areas with no power connection those will be the least popular and most likely to be free, so you’re more likely to find a space to work in.

Filed under: Tech

  • 1
  • 2
  • 3
  • …
  • 10
  • Next Page »

Latest Padel Match

Jean Galea

Investor | Dad | Global Citizen | Athlete

Follow @jeangalea

  • My Padel Experience
  • Affiliate Disclaimer
  • Cookies
  • Contact

Copyright © 2006 - 2025 · Hosted at Kinsta · Built on the Genesis Framework