
It’s important that before you start you understand the concept of volumes on Synology Diskstations, because that’s the first thing you will need to set up before you set up Time Machine backups.
Volumes on the Synology Diskstation
You can use the Synology RAID calculator to help determine how you want to set up volumes. That being said, in this case you want to just make one, and then create shares to logically organize things.
The advantage to creating multiple volumes comes when you are using different size drives, want different levels of redundancy, or have significantly different uses .Let’s take an example a NAS with 4 x 6TBb drives. The only advantage you would gain would be less loss of data if an array fails, but at the cost of a higher risk of array failure.
If you have one volume in SHR2:
- One pool of 12TB usable space
- Two drives need to fail before there is a risk of data loss
- Performance penalty from SHR2
- Slight performance penalty in situations where there is significant use from two sources
If you have two volumes in SHR1:
- Two pools of 6TB
- One drive needs to fail before there is a risk of data loss
- Less performance penalty from SHR
- No penalty from simultaneous use as long as each use is on a different volume
Thus, I suggest setting up one volume. You may consider setting it up with SHR1 and a hot spare. No performance penalty from the second redundant drive and you still have protection; the trade-off is you get a big performance penalty when the hot spare is activated (while it rebuilds) and there’s still a risk of the array failing if a second drive fails while the array is rebuilding.
Backing up your devices to NAS using Time Machine
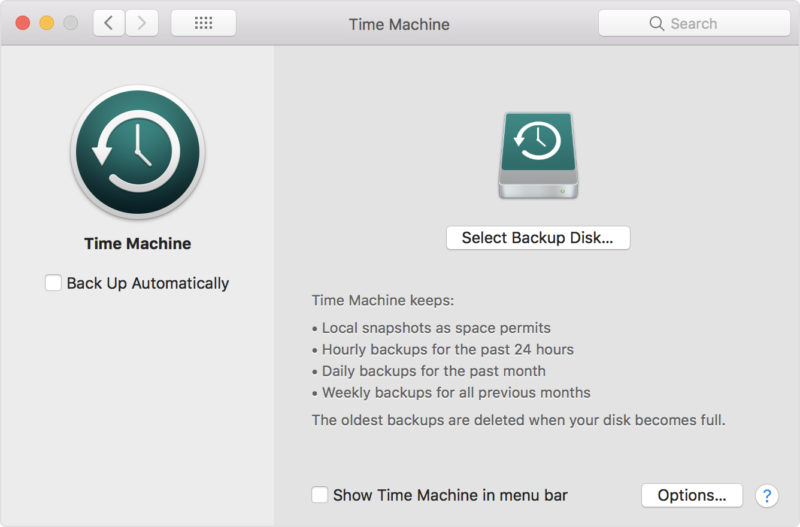
Time Machine by default backs up nearly everything in your macOS partition. It excludes log files, Spotlight indexes, caches, temporary files and trash (have a look: On OS X, what files are excluded by rule from a Time Machine backup?).
Some of the more obvious user file exclusions are Trash, Document revisions and MobileBackups from the local Time Machine store are all excluded. The rest of the exclusions are for system things like caches and databases that exist to index other files where the system can regenerate these databases after a restore.
I’ve also noticed that when restoring from a backup you will need to sign in to App Store and iCloud again and Chrome extensions need to be re-installed.
The backup includes docker files, npm packages, your personal files etc. When the backup is completed, the hard drive will NOT be bootable, meaning that you can’t run macOS from your Time machine backup.
You can restore from a Time machine backup without or after installing an operating system. If you restore without installing an operating system:
- All the backup will be restored to your disk, including the operating system (for example Yosemite). [NOTE: If the Mac you are restoring to does not support the version of macOS in your TM Backup, it will still not be able to boot from the restore].
- It can be done from either Recovery or Installation USB. No internet access is required.
- After the backup is restored, everything will be exactly how it was while you were doing the backup.
If you restore after installing an operating system:
- Only personal files and the files you select can be restored and will not restore the operating system.
- Might not restore packages, system tweaks and files that are stored in directories other than traditional ones (for example “/MyApp/mysourcecode.cs” will not be restored by default).
macOS’ built-in Time Machine is a fantastic way to easily back up a Mac, but it has its limitations. The utility’s archiving ability is extremely useful, but on the recovery end of things, Time Machine isn’t as flexible as power users may require their backup solution be.
Primarily, a Time Machine drive cannot be plugged in and booted from. Bootable backups can be great for quick turn-arounds in the case of a failed or replaced disk. Simply plug in the drive, boot your Mac with the option key held down, and boom — you’re off to the races.
The best way to make bootable backups of your Mac is Carbon Copy Cloner. It’s an excellent way to diversify your backups beyond Time Machine. Moreover, there are some advantages to having a bootable backup of your Mac.
Setting it Up
Part 1 – Create a share
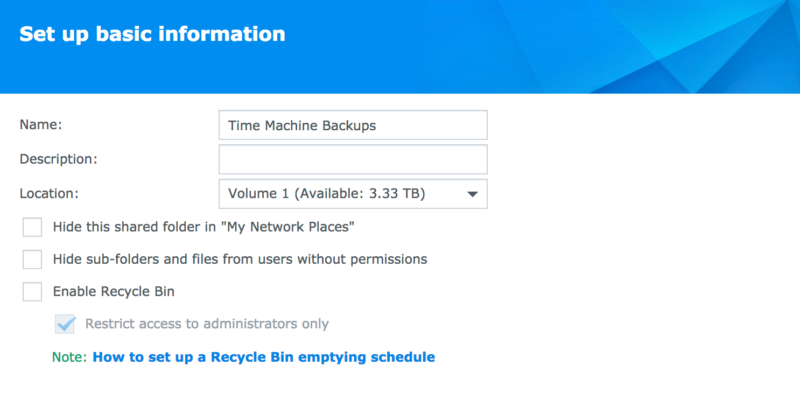
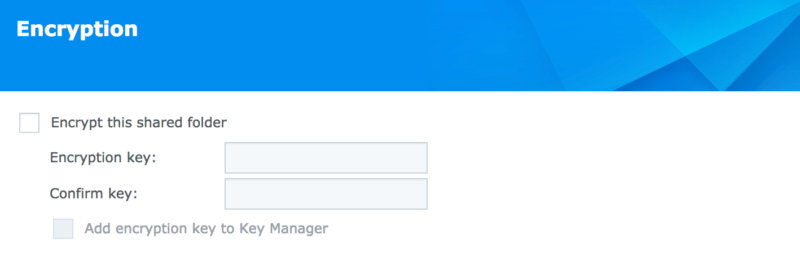
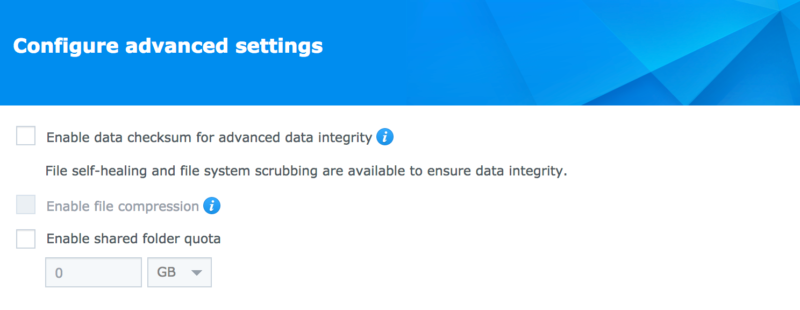
- Open Control Panel.
- Go to File Share.
- Click the [ Create ] button.
- Name the share something like Time Machine Backups (spaces are okay).
- Uncheck “Enable Recycle Bin” (you’re never going to need to fish your backups out of the trash, since you’ll not be accessing the files directly yourself, so this feature would waste space).
- Uncheck “Encrypt this shared folder”. Here we are using the general principle of using the vendor supplied feature where possible. In the event of problems you are more like to find someone who knows Time Machine rather than Synology encryption. An argument could also be made in favor of having the DiskStation do the encryption which will save resources on your Mac. If you encrypt the target shared folder on the NAS the share must be mounted (unencrypted) in order for the Time Machine backups to run. You will need to do this each time you wish to run the backup. If the share is unmounted you will be unable to gain access to it until it is mounted in the DSM.
- Uncheck “Enable data checksum for advanced data integrity”. Time Machine will take care of checking the health of your backups and fixing them if necessary.
- Click the [ Apply ] button.
Next you need to create a user to access the share.
Part 2 – Create a user
- In Control Panel go to User.
- Click [ Create ].
- Make a user named something like TM_iMac (we will create a user for each machine we will be backing up).
- Click [ Next ]
- Make sure the user is in the “users” group and click [ Next ].
- Check the box to give the user Read/Write access to your Time Machine Backups share (or whatever you named it).
- Click [ Next ].
- Set the quota to about 3 times the size of the drive you’re going to back up. You must set the quota to something other than “0” or “Unlimited” or Time Machine will keep backing up forever and will eventually fill your entire filesystem.
- Click [ Next ].
- Ignore the Application Permissions and click [ Next ].
- Ignore the Speed Settings and click [ Next ] (setting a speed limit will slow down your backups)
- Click [ Apply ].
I would use the add new user accounts designed specifically for each Mac computer that is going to be backing up via Time Machine (Main Menu>Control Panel>User>Create). Have the accounts named after the device, ex: iMacTM, MacBookAirTM, MacMiniTM, etc. This allows you to glance at your connection log file and easily see which Macs have recently backed up.
If you only used your admin account to give each mac access it will be hard to figure out which macs are actually doing their backups and which ones haven’t done one recently.
Next you have to change the AFP protocol settings because they are broken by default.
Part 3 – Fix AFP settings to work with Time Machine
- In Control Panel go to File Services
- If “Enable SMB Service” is not checked, check it.
- If “Enable AFP Service” is not checked, check it.
- Click [ Advanced Settings ] in the AFP section.
- Check the box “Release resources immediately after disconnect” — if you do not check this you will get an error from Time Machine of “the volume is already in use” at the end of your backup and Time Machine will stick on “waiting to complete first backup” forever
- Follow the link to “Enable to Bonjour service discovery at Service Directory”
- Check the boxes “Enable Bonjour service discovery” and “Enable Bonjour Time Machine broadcast via AFP” and “Enable Bonjour Time Machine broadcast via SMB”.
- Click [ Apply ].
Part 4 – Configure Time Machine on your Mac
- Go to Time Machine in your menu bar or Preferences
- Click Select Disk
- Select the DiskStation share (whatever you named it in part 1)
- Save your settings.
Possible Issues
You might possibly run into issues since the Synology NAS is not a native Apple device, but it mostly plays well. If you’re getting issues with backups needing to be recreated from scratch, check this article.
I have a feeling that time machine backups work better with Apple hardware, but it’s not a big deal in my opinion. I previously used time machine with a time capsule and I remember having less issues with backups when compared to my current setup with the Synology NAS.
On the other hand, it was also a simpler setup with one Mac device backing to a time machine, while I now have several devices using time machine to back up over the same WiFi network to the same NAS. Not to mention the other services being used on the NAS such as cloud backups, Plex, etc. So the congestion of the network might have a part in the issues too.
Recovering Files with Time Machine
Recovering a file from a Time Machine backup is brilliantly easy. Simply navigate to the Time Machine icon in your Mac’s menu bar and select “Enter Time Machine”.
You can navigate to the folder your file was in with the Finder window, but the real magic takes place with the slider on the right side of the screen. Scrubbing over it with the cursor shows the dates and times of available backups. Recovering something that was accidentally deleted from your Documents folder is as easy as navigating to that folder and going back until reaching a point in time before the file was deleted.
(The same technique can be used if you wish to recover an older version of a file that is still present on your Mac.)
Once you’re done, click the “Restore” button to copy the file from the backup drive and return it to your Mac’s main drive. If a document exists in the directory with the same name, macOS will ask you what it should do.
Restoring a Full Backup
If you reformat or replace your Mac, Setup Assistant can be used to copy all (or some) data from a Time Machine drive.
Provided that the time machine backups have been done correctly, you can then restore without much of a problem.
To test things out, I opened a formatted Macbook and tried to restore a backup from a previous Macbook.
The first issue to keep in mind is that you need to have the destination device have the same operating system installed as the one from which the backup source was taken. So if you buy a new Macbook that has an older version of MacOS compared to the backup, you will need to set up the new Macbook as a new device, log in to the App Store, download and install the latest corresponding MacOS and then restart and hit CMD+R to enter the recovery mode and select the option to restore from a time machine backup.
The second issue I encountered was the slow speed of restoring the backups. Migrating manually from one Macbook to another via a USB-C cable took 3 hours, but restoring from a time machine backup from the NAS to the Macbook took 32 hours.
The third issue came up when I tried to copy a NAS backup onto an external drive and then restore from the drive to the Macbook. That gives you speeds comparable to transferring from one Macbook to another, so around 3 hours in my case. That’s a big difference compared to 32 hours.
The problem is that the Synology NAS is not compatible with Mac drive formatting while Time Machine, on the other hand, can only use the proprietary Mac formatting, so it will not recognise any FAT or NTFS drives. Time Machine requires that an external drive be formatted like a Mac startup disk: Mac OS Extended (Journaled) with a GUID Partition Table (GPT).
The solution was to use a second external drive that is formatted in that way. So I connected an exFAT formatted drive to the Synology NAS to copy over the TM backup, then proceeded to connect that drive to another Mac and transferred the backup to another external drive formatted with the Mac file system, following which I could use that drive for a TM restore.
Note also that the backup file must be in the root directory of the external drive. I initially had it within a folder and the restore procedure did not find the backups. I then moved them one level up into the root folder of the drive and reinserted the drive and Time Machine found all the backups within the container without any problem.
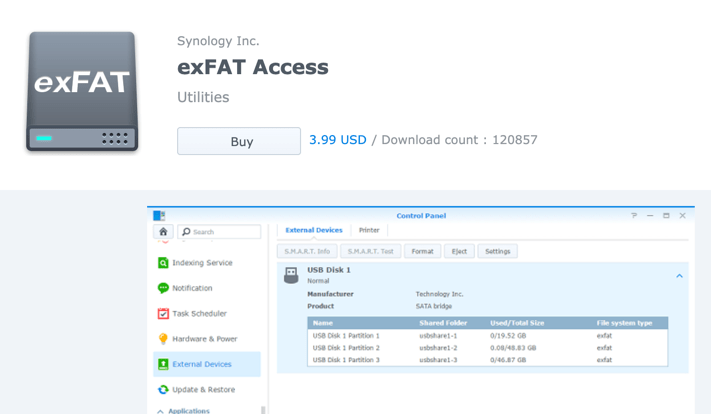
Note that in order to be able to use exFAT on the NAS you will need to purchase the exFAT package for 3.99USD. If you absolutely want to avoid that you can use NTFS if you will only need to read files from the Mac (you can also install an NTFS compatibility package on Mac). If you’re using software like Parallels Desktop to also run Windows on the Mac you can also copy and write to the external drive using that software through Windows.
NTFS is the best choice for anybody who is entirely or primarily Windows-based, while exFAT is probably the best choice that anybody who regularly shares files between a PC and a Mac. Taking into account the file size and volume size limitations, FAT32 also remains an option for external drives that need to be accessed across a wide range of Windows, Mac and Linux systems.
Other Solutions
- MSP 360 Backup
- Chronosync
- Carbon Copy Cloner (CCC)
- Freefilesync
CCC is a very popular tool in the Mac community. When using this software, if you require a bootable backup or if you ever need to restore system files, you must use an external hard drive enclosure attached directly to your Mac to create a bootable backup.
Also taken from the CCC website:
Backing up data over a wireless connection will be considerably slower than backing up over an ethernet connection. 802.11n networks support approximately 300 Mb/s of rated (theoretical) bandwidth under the best conditions, but they usually operate at much lower speeds (130 Mbps and below, which is comparable to 16 MB/s). Bandwidth drops considerably as you get further from the base station (a wooden door between your Mac and the router will cut the signal in half), and the file sharing protocol overhead will reduce your achievable bandwidth yet more. So practically speaking, you’re lucky to get 8 MB/s over a wireless connection while sitting right next to the base station. If you’re running Yosemite or later, that performance could be cut in half due to Apple Wireless Direct Link (AWDL), which causes the Airport card’s interface bandwidth to be shared between your ordinary WiFi network and an ad hoc network hosted by your Mac.
We performed a simple bandwidth test to a fourth generation Airport Extreme Base Station (802.11n) to demonstrate the performance decline. We copied a 100MB file to an external hard drive attached to the base station via USB in three scenarios: 1. An ethernet connection to the base station, 2. Sitting a few feet from the base station, and 3. Sitting across the house from the base station (~35 feet, no line of sight to the base station). The results were 6.5s (15.5 MB/s), 18.7s (5.3 MB/s), and 256s (0.39 MB/s) for the three scenarios, respectively. So, before you try to back up over a wireless network, consider running a simple test in the Finder to see just how fast your connection is. If it takes more than a minute to copy a 100MB file, your connection is too slow to be practical for backup purposes.
Network file sharing is a surprisingly CPU-intensive task. While network appliances are well suited to the task of serving media to multiple workstations, the overhead of individual filesystem transactions makes them less suited to the task of backing up millions of files. Media files, in comparison, are generally large and the required data rate for streaming media is relatively low. Consider a 1-hour, 1GB HD movie file. Streaming 1GB over the course of an hour requires only 0.27MB/s. That’s an easy task, even over a weak wireless network. But if you want to back up 100GB of data in an hour, and that 100GB is made up of a million smaller files, then a network appliance may not be up to that task.
The actual bandwidth that you achieve in your backup task will be based on the number of files you’re copying, the file size distribution, and the number and size of extended attributes in the source data set. Copying large files (e.g. media files) to a network volume will achieve the maximum potential bandwidth, while copying lots of small files will take quite a bit longer due to network filesystem overhead. If the data that you’re backing up consists primarily of large files, e.g. music, photos, video — backing up directly to a network appliance will be fine. If you’re backing up system files or applications, or many files that are smaller than a few MB, we recommend that you back up to a disk image on your network appliance to improve performance and to maintain important filesystem metadata.
What method do you use to backup your Mac devices to the Synology NAS?
Preparing a Mac for Resale – Factory Reset
If you want to prepare a Mac for resale, you want to make sure that you’ve erased all the data on your drives and reinstalled the OS so the person buying it has the same experience as if he bought the computer new, and you leave none of your data lying around.
With the previous generation of spindle-based drives, we used to rewrite the drive with zeros in multiple passes to make sure the magnetic mechanisms of those drives truly didn’t contain any of our data, but this is no longer necessary with SSDs.
Therefore, you will not see any secure erase options when formatting your drive if it’s an SSD. It’s as easy as hitting the erase option and you’re done.
Here’s the full process of preparing a Mac for resale:

I have been successfully backing up my TimeMachine for months now. But, am now getting messages that the disk is full. Why isn’t Time Machine deleting old backups to create space?
Source Disk is 1TB
Synology is set to 1200GB folder size.
Hello, have you encountered problems with big sur and time machine with synology?
thanks!
2 questions.
1) Unclearn about whether to set encryption or not. The blog says do not set encryption on Synomlogy. The a comment says that they tried it and were not able to restore. A response was “Just turn the encryption and it works” Not sure which instruction to follow.
2) Has anyone done a succesfull restore on a new mac to see if it can be used when upgrading.
I had tried to use the timemachine feature of the Synology when I got it but ran into problems. When I searched google folks said that it does not really work well So I gave up. Question iis whether or not it works well enough to to incremental backup and of the restore works. Have they fixed the issues they had in the past?
I didn’t set up encryption on Synology, but the TM machine backups are set to be encrypted.
I have performed several successful restores from TM backups from a Synology.
Backing up works successfully. But I enabled Time Machine encryption on the client side, and I tried to restore to a new MacBook unsuccessfully. It keeps telling me that No volume are found.
Clean install of macOS Mojave, this is very disappointing.
Just turn the encryption and it works
Thanks for the article. I have gone through this and not trying to set up the Time Machine preferences on my iMac however when I go to select a disk the screen that pops up only shows “Other AirPort Time Capsule”. If I click this and click Set Up… it opens the AirPort Utility which only shows “Internet”
Hi! Thanks for this article. I’m having two issues. 1) The limit for the User is not allowing me the option of TB only GB – and it is limiting me to only 4097 GB, yet, I have 19 TB (19000 GB) available on the volume. I want to set it at 14000. HELP! Also, when setting up the file system the option for Bonjour does not exist. I don’t know why. This is a new DS1817!
I have looked high and low for an answer to what I believe is a FUNDAMENTAL question. How do I set the backup schedule for my Synology NAS? I have it all set up correctly as it is performing the Time Machine backup, but it does it on its own schedule that I cannot locate. In the OSX Time Machine prefs I have the “Back Up Automatically” box UNCHECKED, but the NAS still cranks up a backup at some hourly schedule plus 2 minutes, e.g., at 11:02 AM yesterday and 1:02 PM today.
Where do I change the NAS schedule? I am a basic, hobbyist, homebound user and only need (need?… not really) a backup once or twice a week.
thank you for the instructions, very clear, good. but one thing, I keep reading AFP is to be phased out and SMB is the new thing.. (high Sierra). I can make afp work with my syno / MacBook but if I go the other way Mac complains that network use or password is wrong even though I connect through finder with the same credentials. any view as to whether or not I should persevere with smb/ what I might be doing wrong? I also found the script from the “long suffering” person that several other readers have come across.. thanks!
Time Machine backup to Synology NAS is much, much slower compared to using a USB hard disk as my Time Capsule. Is anyone else seeing really slow transfer rates to Synology NAS?
I think that depends on what kind of WiFi connection you have, or whether you have everything wired instead. Mine isn’t so slow.
Really clear and easy to understand.Thank you Jean.
Very helpful indeed. I looked at the Synology instructions and just gave up to try another day. Today was another day and I found both your instructions and those of somebody else who had evidently suffered greatly before he succeeded. I just followed your instructions and it was a breeze. Worked first time and left me wondering what all of the fuss was about.
Caveat: In a couple of places I found myself looking at Synology screens that were a bit different and required me to think. But I am guessing this was DSM version updates since you published.
Thank you so much! This is so much better than what Synology has on their site. I could not get it to work with their explanation but with these instructions I set up Time Machine on both of my macs without an issue.
Best explanation I’ve found so far! Thank you!