When you enable SSL on a Synology Diskstation, accessing it over the local network will throw up a selection of security warnings on browsers.
There are 3 choices here for the LAN user:
- Ignore the warnings and click through
- Register an Internet FQDN to your local IP
- Create a self-signed SSL and root CA to sign the SSL
Choice 1 is the easiest but it gets annoying after a while. If you are using the NAS locally in your house only and you’re not making it available over the internet, you might as well disable SSL altogether as you won’t be getting much benefit out of it. If you’re the geeky type and want to do things the right way, however, keep reading.
Out of the three choices, choice 2 is the most proper way to do it if, especially if you’re making the NAS available over the internet. You will need a public domain name to so you can create a fully qualified domain name (FQDN) for your Diskstation (something like https://ds.mydomain.com). Next you can generate a valid Certificate Signing Request (CSR) for the FQDN and configure DNS to point back to your local LAN and setup whatever routing is required. This is best if you need to secure a local LAN asset where you do not control all devices accessing the Diskstation.
Choice 3 is in my opinion the best option for those who are only using the NAS locally.
It has two prerequisites:
- Your Diskstation must have a fixed IP address on your LAN.
- You must be able to add or assign certificates to devices you want to approve your SSL.
If you can satisfy those conditions, proceed with the following steps:
In DSM 6.0 -> Control Panel -> Security -> Certificate
Click “Add” to start the process and choose “Create self-signed certificate”
First you create a Certificate Authority (CA) which is the master key that will sign the site usable SSL.

You will need to supply the certificate details. What you fill in is not very important, you can use dummy data if you want.
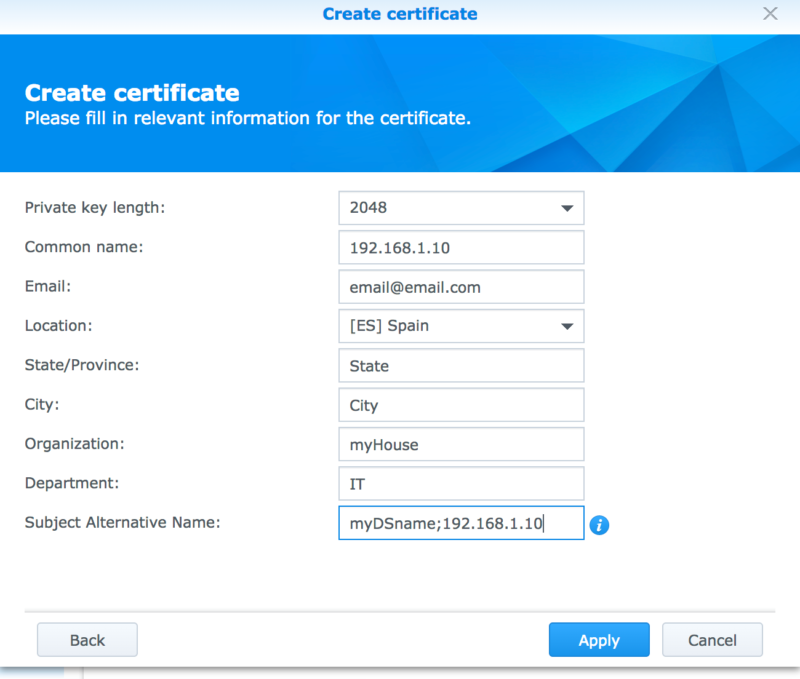
Creating the self-signed certificate from the Synology control panel has a key step that you must complete or the certificate will be invalid. The Subject Alternative Name (SAN) in the second step must contain BOTH the name of the Disktation on your network (“myDSname”) and its local fixed IP (192.168.1.10)
Once your certificate has been generated click “Configure” in DSM to set the new certificate to be the default for the system (The internal web server will restart) so that when you attempt to load the Diskstation site the correct SSL certificate will be presented to your browser.
Now you need to export the newly generated certificates from your Diskstation and import the root CA [and the SSL certificate] into your local machine’s certificate store so that they will be recognised as valid.
Check this page to understand how to install certificates system-wide as well as in specific browsers that handle their own certificates. It also includes details on installing the certificates on your mobile devices (iOS and Android).
Further resources: If you are making the NAS publicly accessibly over the internet, you can follow Mike Tabor’s guide on using Let’s Encrypt SSL certificates as they are completely free and work perfectly.