
Converting from fiat to crypto and vice versa remains one of the big issues for Bitcoin and other crypto adoption, especially in certain countries.
Traditional banks, due to various reasons including government pressure, have been slow to adapt to the new realities of digital assets like Bitcoin and other cryptocurrencies.
Read now: The best crypto debit cards in Europe
I suspect a significant fear of having to cover all their bases for KYC/AML requirements as one of the other reasons that they have been quite wary of their customers transacting with crypto exchanges over the past years.

Unfortunately, this makes it hard for private or corporate crypto investors to find good onramps and offramps to deal with crypto if their banks put up significant obstacles to doing so.
Further reading: The Best Crypto Exchanges in Europe
The United States is currently the place where it’s easiest for citizens to buy and sell Bitcoin and other cryptocurrencies. Not only does it have a long tradition of tech innovation, but it’s the home base of many crypto entrepreneurs, educators and crypto companies.
If you live in the US, you will find that many banks understand crypto and allow you to transfer money to and from exchanges, but things are different in many European countries.

For example, in Malta, the self-proclaimed “blockchain island”, it has become almost impossible to buy any crypto using a local bank account, as most of the limited number of banks available there block transactions to exchanges or threaten to close your account if you did any transfers in the past that they were not able to block.


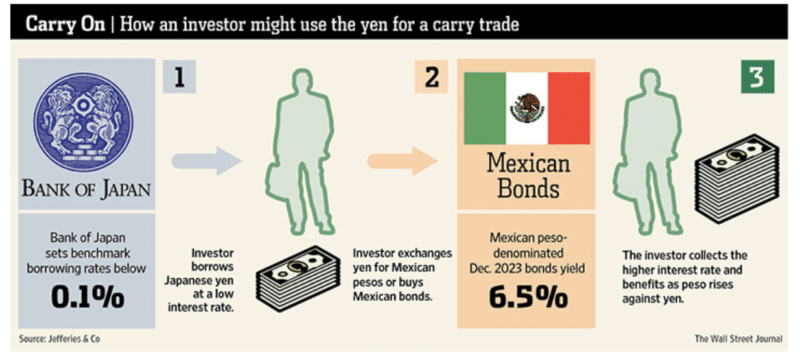 A carry trade or “carry trading’ is a unique trading strategy where one takes a loan at a low-interest rate and then takes that loan to invest in an asset that provides a significantly higher rate of return. It’s a strategy that has been used in traditional markets for many years between various fiat currencies but lately, many cryptocurrency enthusiasts are using this same strategy with a twist. It’s time to introduce yourself to the crypto carry trade.