Jean Galea

Health, Wealth, Relationships, Wisdom

  • Start Here
  • Guides
    • Beginner?s Guide to Investing
    • Cryptocurrencies
    • Stocks
    • P2P Lending
    • Real Estate
    • Forex
    • CFD Trading
    • Start and Monetize a Blog
  • My Story
  • Blog
    • Cryptoassets
    • P2P Lending
    • Real estate
  • Consultancy
    • Consult with Jean
    • Consult a Lawyer on Taxation and Corporate Setups
  • Podcast
  • Search

🆚 PayPal VS Wise Borderless

Last updated: February 15, 202326 Comments


Wise introduced borderless banking in 2017. The big advantage it gives you is that you can have bank accounts in multiple currencies. As soon as they launched I started to think of how it could help me get rid of PayPal and its high fees.

First, let me introduce you briefly to Wise Borderless. If you want to read my full review of this product, do browse over to my review of Wise Borderless.

The vast majority of entrepreneurs I know require a combination of accounts in these three major currencies:

  • US Dollars (USD)
  • Euro (EUR)
  • British Pounds (GBP)

The problem so far has been the simple fact that it’s unnecessarily and frustratingly hard or downright impossible to open a bank account in another country than the one your business is based in.

So for example if your business is based in the UK, but you make all your online sales in USD, you would probably want a USD account so that you would be able to transfer money to it without losing on exchange rates.

This problem is now solved with Transferwise’s borderless banking system. Once you open an account with Transferwise, you will be able to apply for borderless banking and select the accounts you need (USD, EUR and GBP available at the moment). Within two days you will have them in place and you can then start receiving client payments to these accounts.

So what are borderless accounts?

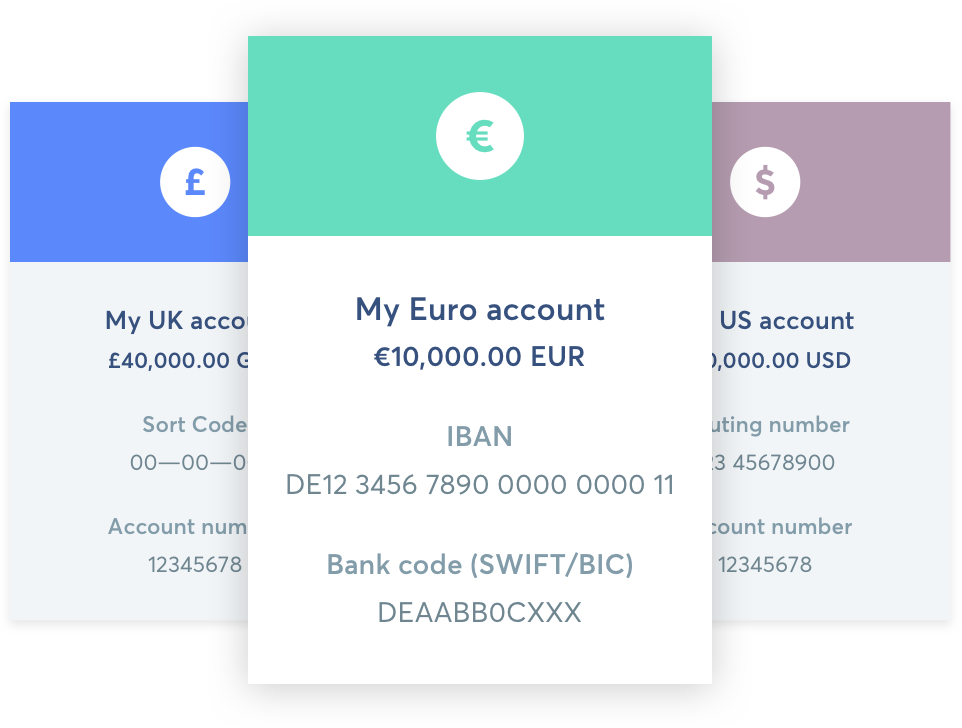
Your borderless account is a bit like having local accounts all over the world, without having to open a real bank account abroad.

It’s a multi-currency account that lets you keep money in 28 currencies, and convert between them at the real exchange rate whenever you need.

You get bank details (like account numbers, bank codes and IBANs) issued by TransferWise so you can receive money in different currencies around the world with zero fees. These aren’t actual bank accounts (they only work similarly to bank accounts), so you don’t have to fill in any forms or have a foreign proof of address. They’re your unique bank details issued by TransferWise to you, that you can give to your friends, company or customers in the US, UK, Eurozone and Australia to get paid in those countries as if you had a bank account there, with zero fees.

How do they work?

  • Add money to your account in any of the supported currencies. Then activate the currencies you want to convert to or hold money in.
  • Convert money between your currencies in seconds whenever you need, always at the real exchange rate, with our low conversion fees.
  • Send money directly from any currency in your account to pay bills, pay friends or move it to another account of your own.
  • Activate AUD, EUR, GBP or USD in your account to get account numbers and IBANs. Give them to your friends, company or customers to receive those currencies from any bank account in Australia, Eurozone, UK or US with zero fees.

Wise vs PayPal

I’ve written about the loss of money due to currency conversion when using PayPal before, so I was hoping that Borderless Banking would solve this issue once and for all.

First Use Case – Invoicing Clients

The first thing I thought of was to replace PayPal completely with TransferWise. Instead of issuing my clients invoices through PayPal, I would ask them to send money directly to my Borderless accounts thus incurring no fees. Apart from incurring no fees to receive the money, I would also avoid the currency conversions, since I now have accounts in the four major currencies I use the most.

TransferWise works perfectly in this case, and for this purpose I was able to eliminate PayPal completely from my workflow.

Second Use Case – Paying Employees or Freelancers Globally

I’ve always used PayPal to pay my employees or collaborators who work in other countries, but this is expensive for both me and them. Again, TransferWise Borderless proved to be a great solution.

I can recommend the borderless accounts for this purpose as you will definitely save a ton of money.

Third Use Case – Withdrawing money from PayPal

Unfortunately, I still had to keep on using PayPal as it is one of the most comfortable ways to set up automated payments for digital products, especially in countries where Stripe is not yet established.

The problem, as I described in another post, is that PayPal charges hefty fees for currency conversions when withdrawing money to your bank account. Even if you use my method to eliminate the conversion on PayPal’s end, you will still have the money converted automatically by your bank when it arrives there. The ideal solution is to have USD be transferred from PayPal to a USD bank account, and so on and so forth with the other currencies. This makes borderless perfect for the job.

My idea was to add each of my borderless accounts to PayPal as withdrawal methods.

However, after checking with PayPal, they have informed me that at this stage they don’t support virtual bank accounts, which is what TransferWise’s Borderless banking solution is classified as.

2Checkout do not allow withdrawals to a Borderless Banking account unfortunately, so I can’t use them there either.

It would also be interesting to know what Stripe are doing, so if any of my readers wants to try that, do leave a comment with the results.

You should be able to use Borderless Banking with other services that support bank wire transfers, such as affiliate systems like Avangate and Shareasale.

While I did not have any luck adding the borderless accounts to PayPal, several readers have reported that they managed to do so by calling PayPal directly. I hate waiting on calls to be honest, and the prospect of dealing with some PayPal rep and trying to convince them to do something like this wasn’t very enticing, so I didn’t bother.

If you want to try it, here’s how:

Go to the contact page within your PayPal account, click call us and you’ll get a freephone number to call (which works on Skype too) and a code to give them. Once you call you have to answer some security questions, then give them the ACH routing number and account number of the Transferwise US bank account. If you’re lucky it will show up instantly on your PayPal account as the Community Federal Savings Bank.

Wrapping Up

This is a great step in the right direction. Revolut released something similar earlier this year, but TransferWise’s solution is better. The last step now is for everyone to be able to use this type of account with PayPal for withdrawals.

In any case, you can still ask clients to pay you to one of your multi-current Wise Borderless accounts, and that’s already a huge bonus for those entrepreneurs and companies who receive invoice payments directly rather than through payment gateways such as 2Checkout, Stripe or PayPal.

Don’t forget that you can now also get a TransferWise debit card, which gives you direct access to your multi-currency Borderless accounts so that you can spend your money anywhere around the world where cards are accepted.

Sign up to Wwise Borderless Banking

  1. Are You Losing out from PayPal’s Exchange Rates?
  2. 🤔 Which PayPal Account is Best for You?
  3. đź’¸ Changing Your PayPal Withdrawal Currency
  4. đź’¸ Understanding PayPal Cross Border Fees
  5. How to Withdraw From PayPal into a Maltese Bank Account
  6. đź’ł Withdrawing Money From PayPal for Non-US Accounts
  7. Which PayPal E-Commerce Checkout Service Should You Use?
  8. 🤔 Should You Open Separate PayPal Accounts for Each of Your E-Commerce Stores?
  9. 🆚 PayPal VS Wise Borderless
  10. đź’ł Linking Virtual Bank Accounts and Cards to PayPal (Revolut, Wise etc)
  11. How to Change Ownership of a PayPal Account

Filed under: Banking, Money

How to Learn a New Language

Last updated: December 22, 20234 Comments

I’m currently fluent in four languages (Maltese, English, Spanish and Italian), and I’m aiming to reach fluency in a few more languages within the next ten years.

I have some knowledge of Catalan, Portuguese, French and Russian too.

It’s fair to say that I’ve spent a good chunk of time dabbling in languages ever since my teenage years. I’ve also tried my hand at Chinese before realizing I didn’t have enough time or energy to get good at it. I still hope to get back to it at some point.

I’ve mostly used Duolingo, class lessons, and 1-to-1 lessons on Italki. I found Duolingo great for the initial steps and building vocabulary, while Italki is really good for advancing fast, provided you find the right teacher. I haven’t had great experiences in a class setting, except for when I took Catalan lessons, as we had a fantastic teacher and a great group of students as well.

Resources for Learning Spanish

Over the past ten years, I’ve been learning Spanish in different ways. Here are my favorite resources.

  • italki – Find a great teacher for 1-1 sessions
  • Profe de Ele – Website with explanations and exercises
  • Duolingo – Great free app to get the basics in place.
  • Mimic Method – Great for learning Pronunciation
  • Gramática de uso del español – Best series of books for learning grammar.

Portuguese

You have Brazilian or European Portuguese. If your intention is to work or live in Portugal or other European territories I would recommend you learn the European version.

This is the website I use apart from having a teacher on iTalki:

Learn European Portuguese

Focus on Sound and Pronunciation

Most people struggle with sound, and it is quite evident that sound can be critical to being understood and understanding others.

[Read more…]

Filed under: Thoughts & Experiences

Chicken Breast Fillets in Cream and Parsley Sauce

Last updated: April 07, 20232 Comments

Machine used: Bosch Autocook Pro multi-cooker

Today’s recipe is one of the easiest you can prepare and is ideal for those who are using the multicooker for the first time.

Ingredients (4 servings)

  • 4 small chicken fillets (180g each)
  • 300ml fresh cream
  • Half a handful of parsley
  • 2 cloves of garlic
  • Salt and pepper
  • Olive oil

Directions

Start with the sauce by peeling and chopping the garlic. Wash the parsley and slice it up. Mix the garlic and the parsley with the cream and add some salt and pepper to the cream. I tend to use my judgment with salt and pepper, erring on the lesser side. You can always add more salt and pepper when the meal is ready if needed.

Spread enough olive oil to cover the bottom of the AutoCook’s pot. Add salt and pepper to the chicken breasts and place them in the pot. Then select the Fry program and the Medium option and press the Start button.

Cook the chicken breasts for 6 minutes and then flip them over to cook the other side. Keep the AutoCook’s top cover open at all times. Check the time left on the AutoCook’s lid. When there are only 2 minutes left, add the cream sauce to the chicken breasts. Keep frying the chicken breasts together with the cream sauce until the AutoCook emits its end of program sound.

That’s it! You can now serve the chicken breasts with an accompanying plate such as rice or pasta. Alternatively, if you are trying to restrict intake of grains, you can use vegetables. I slice up a tomato and add some broccoli to end up with a colorful and healthy dish that tastes great for lunch or dinner.

Filed under: General

đź”’ How to Setup SSL on a Synology NAS

Last updated: March 30, 202016 Comments

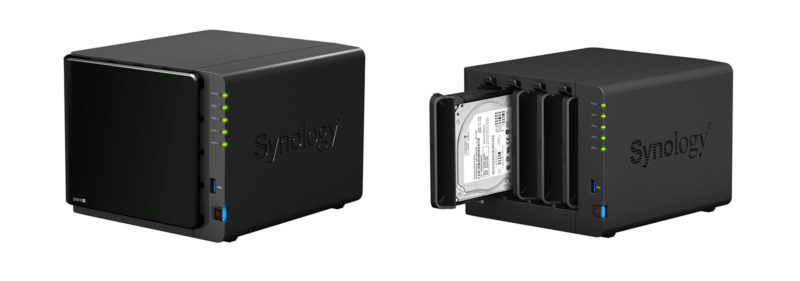
When you enable SSL on a Synology Diskstation, accessing it over the local network will throw up a selection of security warnings on browsers.

There are 3 choices here for the LAN user:

  1. Ignore the warnings and click through
  2. Register an Internet FQDN to your local IP
  3. Create a self-signed SSL and root CA to sign the SSL

Choice 1 is the easiest but it gets annoying after a while. If you are using the NAS locally in your house only and you’re not making it available over the internet, you might as well disable SSL altogether as you won’t be getting much benefit out of it. If you’re the geeky type and want to do things the right way, however, keep reading.

Out of the three choices, choice 2 is the most proper way to do it if, especially if you’re making the NAS available over the internet. You will need a public domain name to so you can create a fully qualified domain name (FQDN) for your Diskstation (something like https://ds.mydomain.com). Next you can generate a valid Certificate Signing Request (CSR) for the FQDN and configure DNS to point back to your local LAN and setup whatever routing is required.  This is best if you need to secure a local LAN asset where you do not control all devices accessing the Diskstation.

Choice 3 is in my opinion the best option for those who are only using the NAS locally.

It has two prerequisites:

  • Your Diskstation must have a fixed IP address on your LAN.
  • You must be able to add or assign certificates to devices you want to approve your SSL.

If you can satisfy those conditions, proceed with the following steps:

In DSM 6.0 -> Control Panel -> Security -> Certificate

Click “Add” to start the process and choose “Create self-signed certificate”

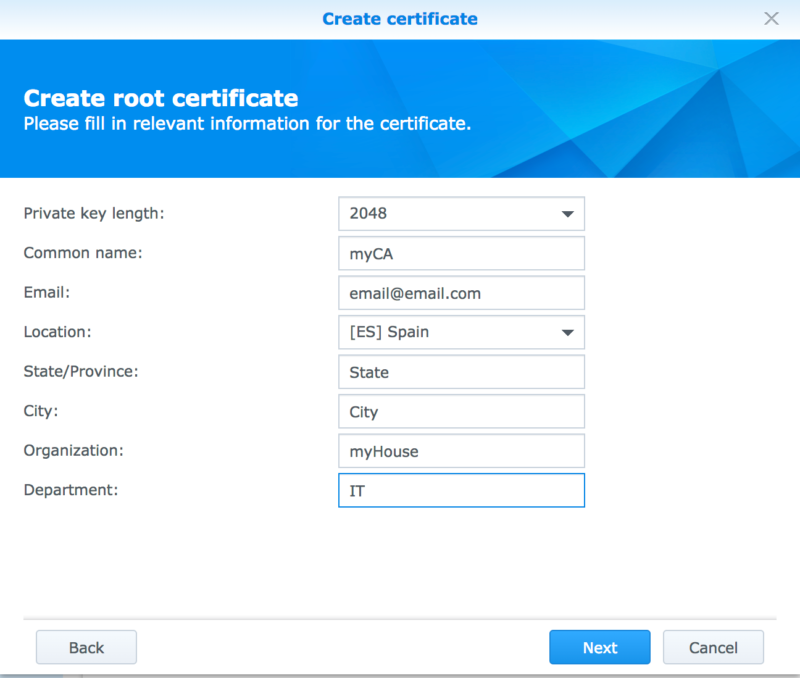
First you create a Certificate Authority (CA) which is the master key that will sign the site usable SSL.

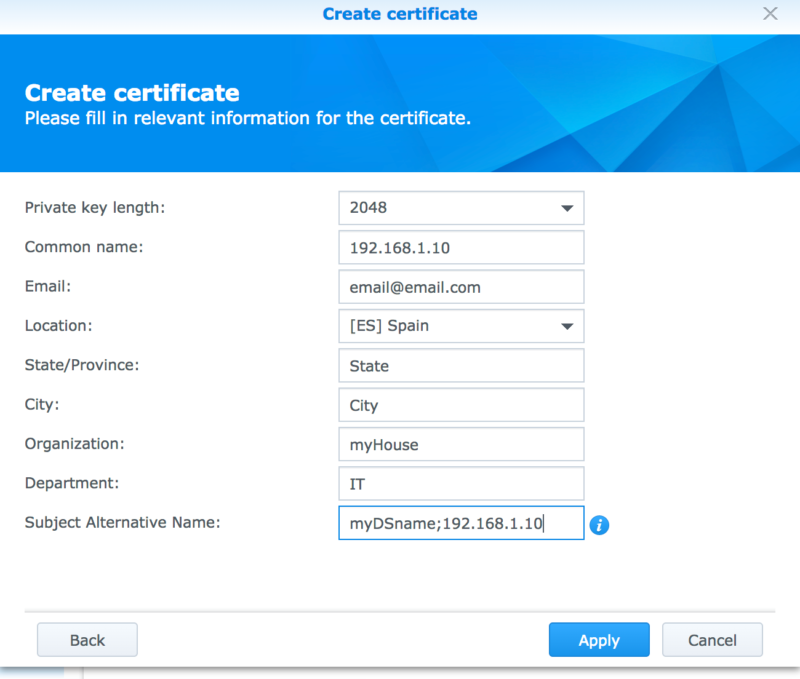
You will need to supply the certificate details. What you fill in is not very important, you can use dummy data if you want.

Creating the self-signed certificate from the Synology control panel has a key step that you must complete or the certificate will be invalid.  The Subject Alternative Name (SAN) in the second step must contain BOTH the name of the Disktation on your network (“myDSname”) and its local fixed IP (192.168.1.10)

Once your certificate has been generated click “Configure” in DSM to set the new certificate to be the default for the system (The internal web server will restart) so that when you attempt to load the Diskstation site the correct SSL certificate will be presented to your browser.

Now you need to export the newly generated certificates from your Diskstation and import the root CA [and the SSL certificate] into your local machine’s certificate store so that they will be recognised as valid.

Check this page to understand how to install certificates system-wide as well as in specific browsers that handle their own certificates. It also includes details on installing the certificates on your mobile devices (iOS and Android).

Further resources: If you are making the NAS publicly accessibly over the internet, you can follow Mike Tabor’s guide on using Let’s Encrypt SSL certificates as they are completely free and work perfectly.

Filed under: Tech

The Cheapest Way to Pay Remote Workers in the Philippines for a European Company

Last updated: April 23, 20203 Comments


Working remotely is becoming more and more popular, with lots of European companies outsourcing part of their workloads to labor in the Philippines. The big question is how to pay these remote workers at the end of every month.

The current methods I know of are:

  • PayPal
  • Bitwage
  • Payoneer
  • Bank transfer

There are many other services but they mostly seem to cater for US companies rather than European ones. For example, Xoom does allow economical transfers of money, but the source bank account or debit/credit card should be in USD, else you will be hit by a conversion fee from EUR to USD, apart from the eventual fee to convert to Philippine Pesos.

So far, the most straightforward service remains PayPal. It is possible to have both a USD and a EUR balance within PayPal accounts, so this gives the best level of flexibility when paying remote workers in the Philippines.

On the other hand, Payoneer is a strong competitor, with the slight disadvantage that you will have to sign up for a Payoneer account and supply some company documents for them to verify the company before being able to put payments through.

To test things out, I sent a payment of around $1000 to the Philippines with both PayPal and Payoneer. I used USD for the PayPal transfer and Euro for the Payoneer transfer, but the value was the same, I just calculated the Eur value using that day’s exchange rate. After calculating all fees, conversion to currencies and receiver’s bank fees, Payoneer comes out the winner as long as you send in Euros. Compared to PayPal, the receiver saved at least $35-45 after all is said and done with a Euro payment. If I had done it in USD the receiver would only save about $8-10.

Have you found any great services for transferring money from Europe to Filipino remote workers? Let me know!

Filed under: Business

  • « Previous Page
  • 1
  • …
  • 75
  • 76
  • 77
  • 78
  • 79
  • …
  • 95
  • Next Page »

Latest Padel Match

Jean Galea

Investor | Dad | Global Citizen | Athlete

Follow @jeangalea

  • My Padel Experience
  • Affiliate Disclaimer
  • Cookies
  • Contact

Copyright © 2006 - 2025 · Hosted at Kinsta · Built on the Genesis Framework